
Dell XPS M1530 Cooling Repair
- Symptom
- A Dell XPS M1530 (regulatory model PP28L) with a cooling assembly due for replacement, and an installed operating system that would not boot.
- Diagnosis
- Fitted a replacement Dell XR216 heatsink-and-fan assembly, cleaning the aged factory compound off the CPU and GPU and leaving the intact gap pad alone. It still wouldn't boot, so a Linux Mint live USB was used to test the hardware with the internal drive left out of the picture.
- Fix
- Cooling rebuilt and verified under load. Processor, memory, graphics, panel, keyboard, touchpad and Wi-Fi all came up working, leaving the drive and the installation on it as the only suspects. Both were retired together for a 120 GB SSD and a clean Linux Mint install. Back in service as a workbench machine.
A Dell XPS M1530 from 2007 needed its cooling assembly replaced, and wouldn't boot the operating system sitting on its own hard drive. The cooling rebuild was straightforward work. The part worth writing down is what happened next: instead of guessing at the no-boot, the machine was booted from a Linux USB stick, which tested everything except the internal drive. Processor, memory, display, keyboard, touchpad and Wi-Fi all came up working. That one test moved an eighteen-year-old laptop from "probably dead" to "one question about the cheapest part in it," before anything was bought. The answer was a 120 GB SSD, and the machine is back in service.
What This Page Is For
First, a disclosure. Unlike the other entries in this portfolio, this one isn't a customer's machine. It's ours. The M1530 is being put back together as a workbench computer, the thing that sits next to the soldering station and pulls up service manuals, schematics, datasheets and repair videos. It's here because the diagnostic sequence is exactly the one we run on a customer laptop that won't start, and this time we could photograph it and take our time.
The question this page is really about is the one we get asked most: "is this old laptop worth fixing, or should I just buy a new one?" That question can't be answered until you know which parts of the machine are actually bad, and "it won't boot" doesn't tell you. It's a single symptom with a long list of possible causes, and they range from free to not worth doing.
It also has an unglamorous ending, which is kept as it happened. Nothing on this laptop turned out to be dramatically broken, including the drive that was replaced. And the finished machine is still slow. Both of those are in here rather than rounded up into a tidier story.
The Long Version
Rebuilding the Cooling, Then Finding Out What Was Left
The thermal work first, because that was the known job, then the diagnosis that followed when the machine still wouldn't start. Skip to where this stands if you'd rather not read about thermal paste.
Pinning Down What the Laptop Actually Is
Dell doesn't put the marketing name on the bottom of the machine. The regulatory sticker reads Model No. PP28L, and that regulatory model corresponds to the Dell XPS M1530. Every part number, service manual and teardown for this laptop is filed under one name or the other, so establishing that link is the first step on any Dell of this era, before ordering anything.
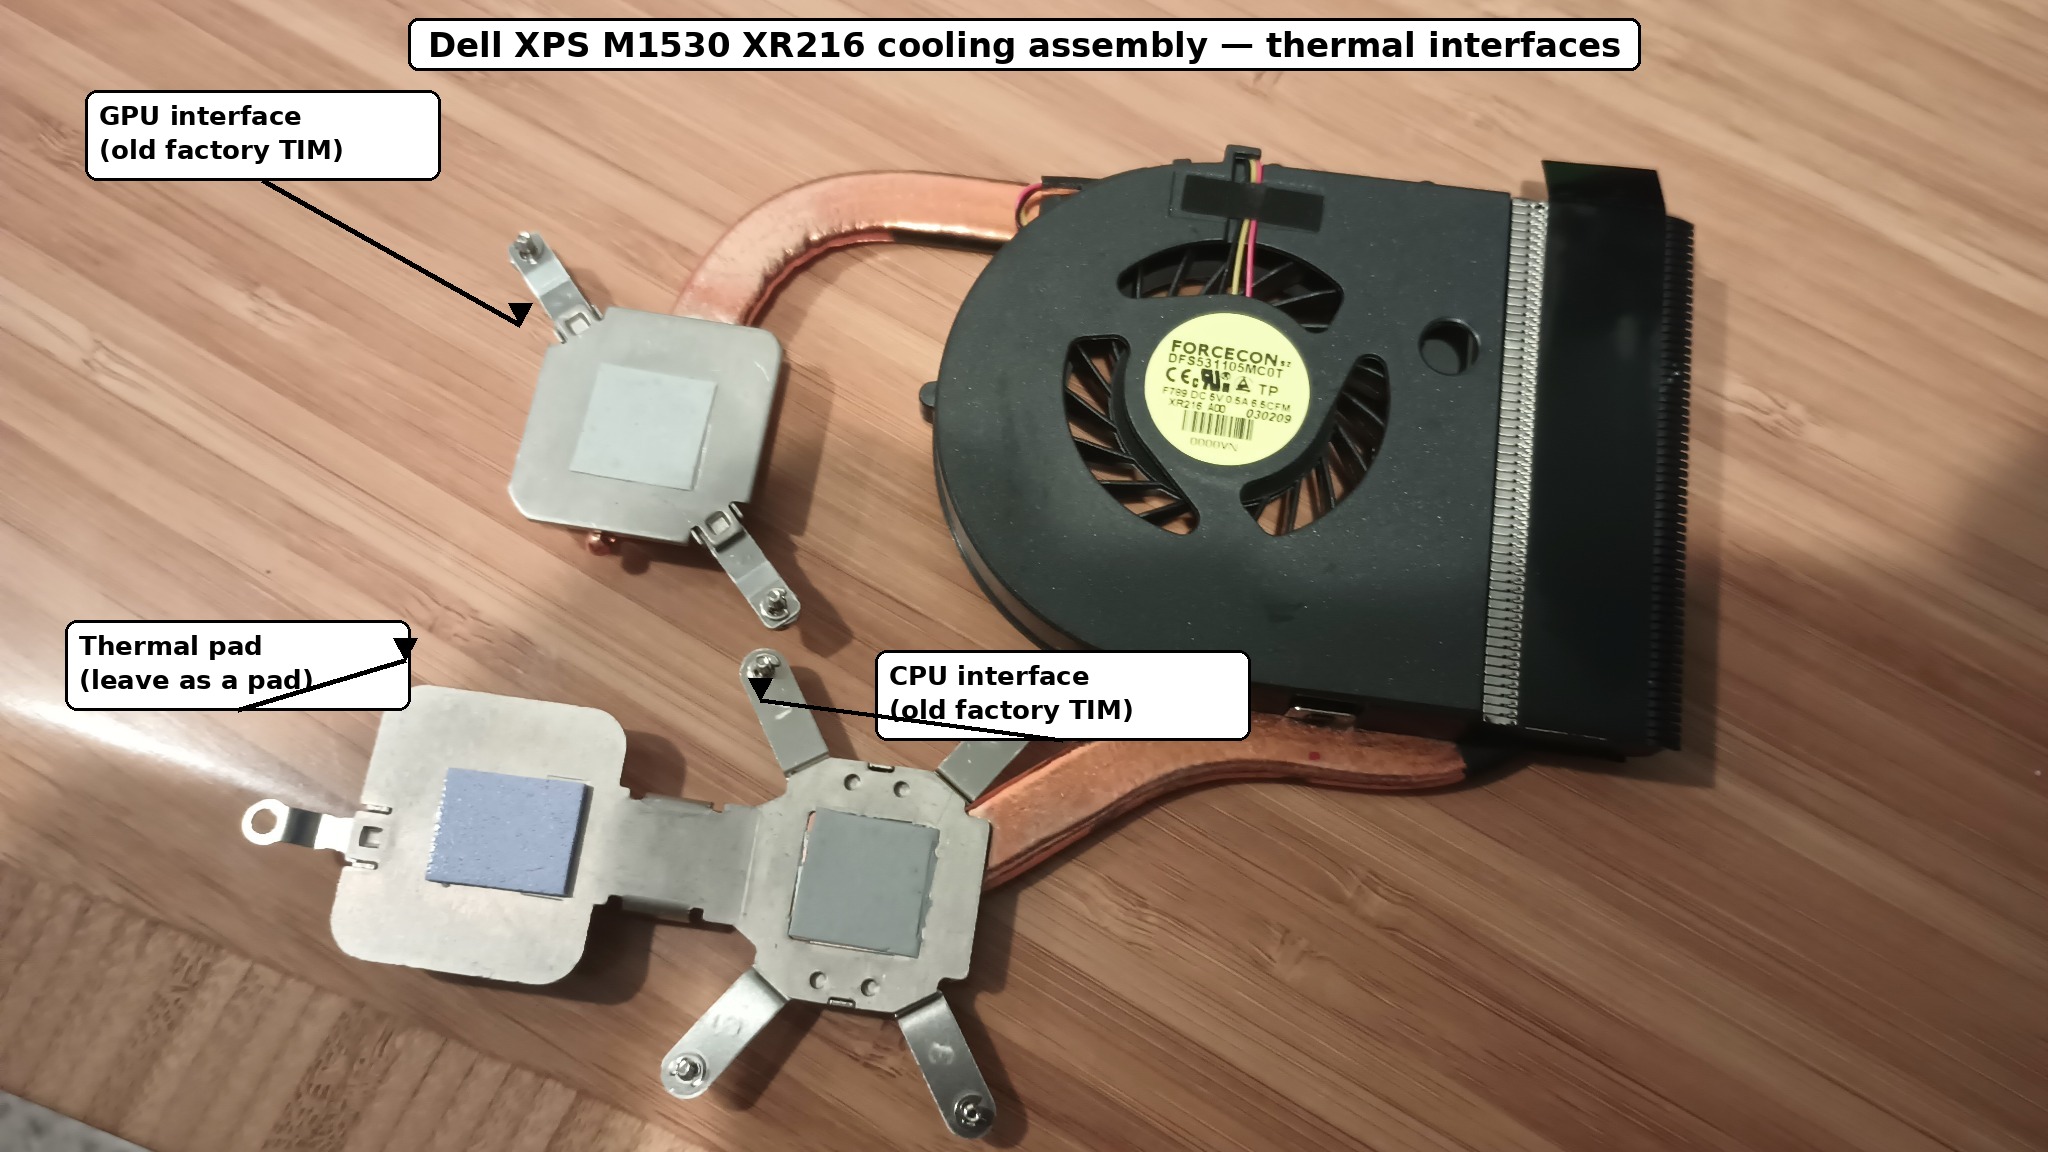
The replacement cooling assembly on the shelf was labeled Dell 0XR216 / XR216. That's the heatsink-and-fan assembly for the M1530: a blower fan, copper heat pipes, a fin stack at the exhaust vent, and the contact plates that carry heat off the CPU, the GPU, and a third component on the board. The fan's own label corroborates it — it reads FORCECON DFS531105MC0T with XR216 A00 printed underneath.
One complication came with it: the part was new old stock that had been sitting unused for years. Factory pre-applied thermal compound is not something to trust after that long in a drawer, which turned a straight swap into a decision about what to keep and what to replace.
Why Cooling on This Particular Laptop Isn't Routine Work
On most laptops, a tired cooling system means throttling, fan noise, and a hot palm rest. Annoying, rarely fatal. The M1530 is a more pointed case, and it's worth knowing why before deciding how much care this job deserves.
This generation of M1530 carries an NVIDIA GeForce 8600M GT, which belongs to a family of mobile GPUs from the late 2000s with a well-documented defect in the packaging — the solder connections between the GPU die and its substrate degrade under repeated heating and cooling. The failure mode is famous among anyone who worked on laptops in that era: a machine that posts to a black screen, or draws corrupted graphics, or stops producing video entirely. Part of how the industry responded at the time was firmware: BIOS updates that simply ran the fan harder and sooner, buying thermal margin the hardware didn't have on its own.
Which reframes the whole job. On this model, the cooling assembly isn't a comfort feature that happens to need service. It's the mitigation for a known hardware weakness, and a degraded one shortens whatever life the GPU has left. That's the argument for doing the thermal interfaces properly rather than smearing paste over what's already there.
Worth saying clearly, though, because it cuts the other way too: this machine's GPU was not failing. It drove the panel at full resolution with no artifacting for the entire live session described further down. The history explains why the repair was worth doing carefully. It is not a diagnosis of this laptop.
Getting the Old Compound Off Before Putting New Compound On
With the original assembly off, dried compound remained on both the CPU and GPU dies. The temptation is to add fresh paste on top and bolt the heatsink down. That doesn't work, for a reason worth understanding rather than just following as a rule.
Thermal compound isn't there to conduct heat — it's a poor conductor compared to the metal on either side of it. Its entire job is to displace air from the microscopic valleys in two surfaces that look flat and aren't. Air is a superb insulator, and that's the problem being solved. Old compound that has dried, cracked, or separated is doing the opposite: it's holding voids open between the die and the heatsink. Laying fresh paste over that traps the voids underneath a layer that looks correct from the outside.
So the old material came off with 99% isopropyl alcohol and a lint-free wipe, down to clean bare metal on both dies. The concentration matters: 99% IPA carries very little water, flashes off in seconds, and leaves nothing behind. Drugstore 70% rubbing alcohol is nearly a third water, dries slowly, and can leave residue on the surface you just cleaned. Once the dies looked dry they were given a short wait anyway, then fresh compound went on.
The same treatment was applied to the CPU and GPU plates on the XR216 itself, for the same reason — the factory material on a part that has sat in storage for years has had just as long to dry out as the material that came off the board.
The One Thing on This Heatsink That Must Not Get Paste
Look at the photo above and the three interfaces are not the same. Two are bare metal plates that take compound. The third is a soft blue-grey thermal pad, sitting on the same bracket as the CPU, bridging to a nearby component on the board.
That pad stays a pad. Paste and pads solve different geometric problems. Compound fills surface roughness measured in microns, across a joint where two flat faces are already clamped nearly together. A pad exists where there's a real, visible gap — because that component sits at a different height than the CPU, and the heatsink physically cannot touch both. Compound in a gap like that slumps, runs, and leaves an air void, which puts you back to insulating the part you were trying to cool. It's a common and expensive substitution, and it fails quietly: the machine works, and the part it was supposed to cool just runs hotter for the rest of its life.
On this assembly the pad was intact, correctly positioned, and still compliant, so it was left exactly as it was. The rule that decided it is simple enough to carry to any other laptop: replace like with like. If a factory interface is a pad, it's a pad for a reason you probably can't see, and of a thickness somebody measured.
Fitting the Assembly
With clean dies and fresh compound, the XR216 went in. The screws were brought down gradually and in rotation, a little at a time on each, rather than driving one fully home before starting the next. Dell numbers these on the heatsink for exactly this reason.
This isn't ceremony. Tightening one corner first tilts the plate, which loads one edge of the die hard and lifts the opposite edge away from it. What you get is uneven mounting pressure, a thicker compound layer on the light side, and on a bare die like these, a genuine risk of cracking a corner. Even pressure across the plate is what makes the joint work.
Before the battery went back in, a short list of checks that cost nothing and are miserable to discover later:
- The fan connector fully seated in its socket on the board
- The heatsink sitting flat, with no visible tilt against the dies
- The thermal pad still in position and not shifted during the fit
- The fan blades and the exhaust path clear, and the fin stack free of packed dust
- No stray cable routed under the assembly or across the fan intake
That last set is the part people mean when they say a cooling repair is "just a fan swap." It isn't one job, it's six things that have to be right at once: fan, contact, compound, pad, mounting pressure, and airflow path. Any one of them wrong and the machine runs hot with a brand-new heatsink in it.
Back Together, and It Still Wouldn't Start
Reassembled, the laptop powered up, ran its fan, and reached BIOS — and then failed to boot the operating system installed on its internal drive.
Here's where an eighteen-year-old machine usually gets written off, because "won't boot" sounds terminal and the diagnosis sounds expensive. It's neither, yet. It's one symptom with a long list of causes sitting behind it: a failed drive, a healthy drive with a corrupted filesystem, a damaged bootloader, a bad memory module, a failing GPU, or a motherboard fault. Those range from a free fix to not worth doing, and nothing so far distinguished between them.
The first thing worth doing costs nothing at all, which is to ask the BIOS what it can see. It reported:
Primary Hard Drive — 320 GB HDD
Small result, but a real one. The drive is spinning, responding to identification, and reporting its own capacity correctly over the SATA link. That doesn't mean the drive is healthy — a disk can identify itself perfectly and still be unable to read half its surface — but it does rule out a dead drive, a dead port, and a disconnected cable in one glance. The interesting failures were all still on the table.
Using a Live USB as a Measuring Instrument
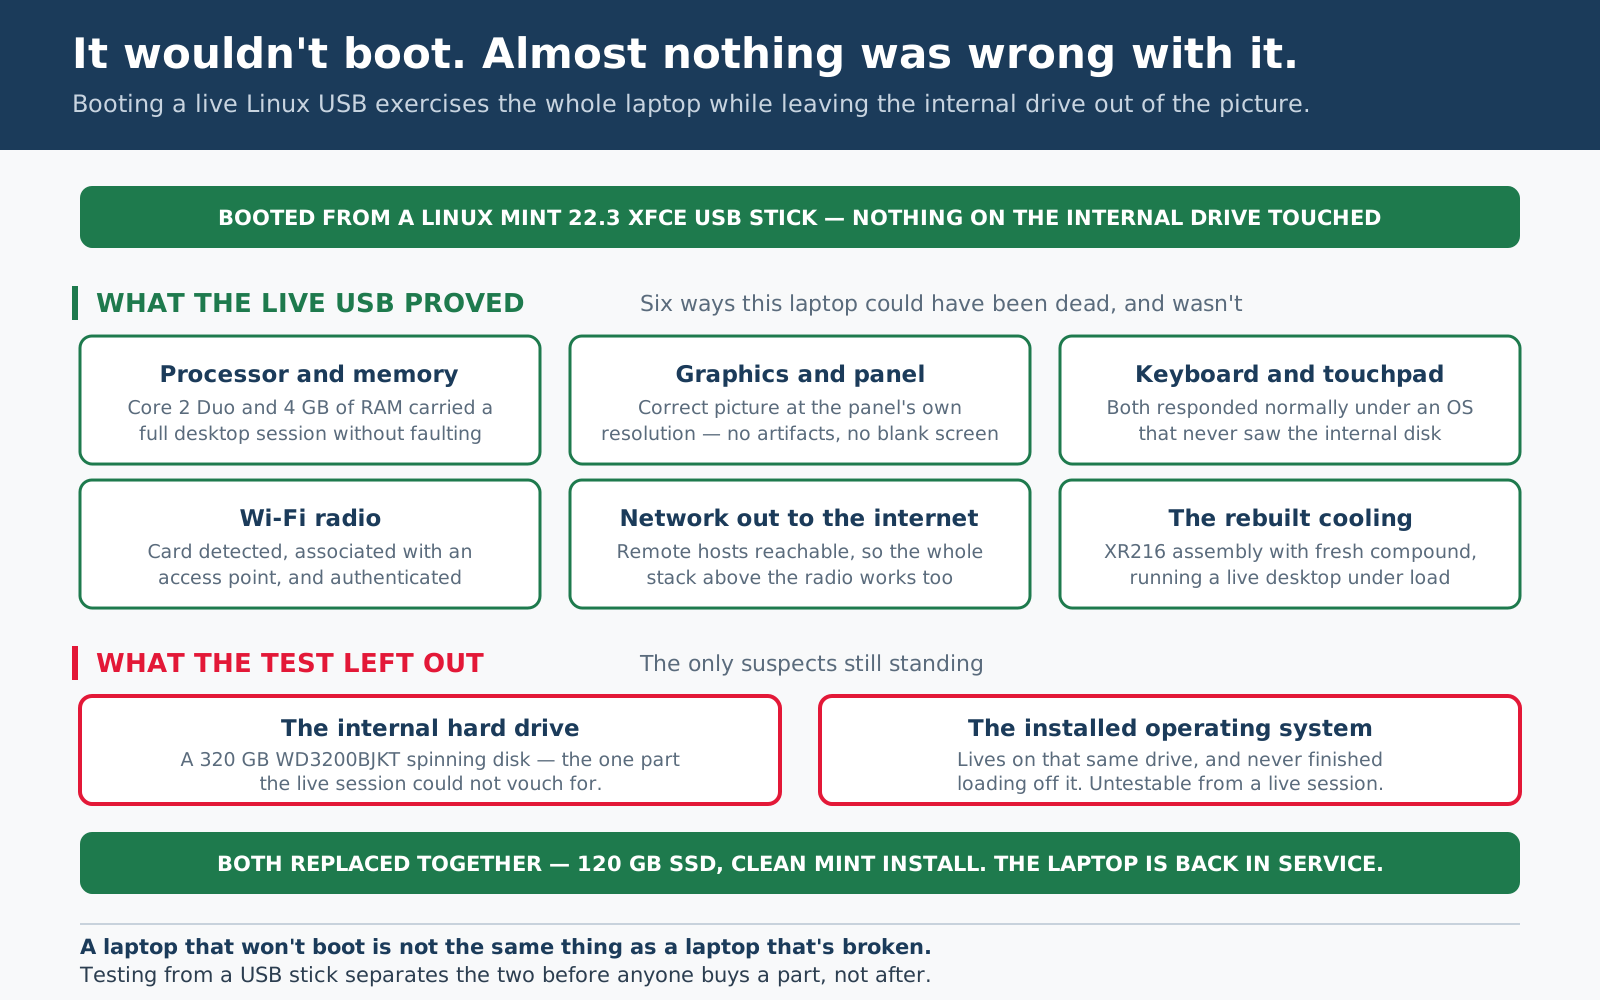
The next move was to boot the machine from a Linux Mint 22.3 Xfce USB stick. Most people meet a live USB as a way to rescue files off a machine that won't start. That's the least interesting thing it does.
What makes it a diagnostic tool is what it excludes. A live session loads a complete operating system into memory and runs from there, never reading the internal disk unless you explicitly tell it to. So it exercises the processor, the memory, the chipset, the graphics hardware, the panel, the keyboard controller, the touchpad, the wireless card and the USB subsystem — while holding constant the two things you're actually suspicious of. Every result it produces is a statement about hardware, with the drive and the installed OS taken out of the equation.
On this machine the live session established, in about ten minutes:
- It booted a full desktop from USB. The processor, the memory and the storage controller are all functional enough to load and run an operating system.
- The display was correct. Right resolution, no artifacting, no corruption — which, given this model's GPU history, is the single most reassuring result on the list.
- The keyboard worked, under an OS that had never touched the internal disk.
- The touchpad worked.
- Wi-Fi associated and authenticated, so the card, its antennas and the mini-PCIe slot are all alive.
- Remote internet hosts were reachable, which proves the whole network stack above the radio, not just the radio.
- The rebuilt cooling ran under load, with the machine doing real work rather than sitting at a BIOS screen.
Put the other way round: every expensive failure was eliminated. No bad RAM, no dead GPU, no failed panel, no motherboard fault, no dead keyboard or touchpad or wireless card. What remained was the drive and what was written on it — the cheapest thing on the list, and the only part of the machine the test had deliberately not looked at.
Finding Out What the Drive Actually Is
From a terminal in the live session:
lsblk -o NAME,SIZE,MODEL,TYPE
Which reported, for the internal drive:
sda 298.1G WDC WD3200BJKT-75F4T0
A Western Digital WD3200BJKT, a 320 GB 2.5-inch SATA mechanical hard disk. Two things fall out of that one line.
The first is a question that comes up constantly and isn't a fault: why does a 320 GB drive show as 298.1 GB? Nothing is missing. Drive manufacturers count in decimal, so 320 GB means 320,000,000,000 bytes. Linux and Windows both report in binary units, where a "gigabyte" is 1,073,741,824 bytes. Divide one by the other and you get 298.02. The drive is exactly the size it says it is; the two sides are using different definitions of the same word. The gap widens with capacity, which is why a 2 TB drive shows up as 1.81 TB and people assume they've been shorted.
The second is the one that matters for what this laptop is being rebuilt to do: this is still a spinning disk. Platters, a motor, and a head on an arm that has to physically move to reach your data.
The Check That Decides Whether a Drive Is Worth Keeping
Worth being clear about what the old drive's problem was, because "the drive" and "a failed drive" are not the same diagnosis. It still worked. It read, it wrote, it identified itself correctly to the BIOS. It was simply slow — slow enough that anything you asked the machine to do crawled, and slow enough that the installed system never finished loading off it.
So at this point the honest thing to say is what we did not do. On a machine where that drive was staying, the next step would be SMART — the self-monitoring data every modern drive keeps about its own condition. On this one it was being retired for an SSD regardless of what SMART said, so it was replaced rather than tested. That's a defensible call here and a bad one on a customer's machine with data on it, which is the distinction worth drawing. The check is cheap. From a live environment, the tools install with:
sudo apt update
sudo apt install smartmontools
The full report for the drive:
sudo smartctl -a /dev/sdaAnd a short self-test, which asks the drive to exercise itself and report the result, started and then read back with:
sudo smartctl -t short /dev/sda
sudo smartctl -l selftest /dev/sda
The values that carry the verdict are reallocated sectors, pending sectors, uncorrectable sectors, power-on hours, drive temperature, and the self-test log. Reallocated and pending sector counts are the ones that decide it: they're the drive telling you it has already found places on its own surface it can no longer trust.
The reason to run it before deciding anything is that it separates two situations that look identical from a boot prompt. A drive with a growing bad-sector count is failing, and everything on it should be copied off immediately. A drive with a clean report and a corrupted installation is a healthy drive that needs an OS reinstalled, and nothing more. One of those is urgent. Neither is expensive, and guessing between them is how people lose data they could have kept.
Which is exactly why it gets run on a customer's machine and didn't need to be on this one. The question SMART answers is "can I trust this drive?" — and that question only has consequences if you're planning to keep the drive, or if something on it matters. Here the answer to both was no.
Where the Time Actually Goes on a Machine This Old
The drive that went in is a Patriot Burst Elite 120 GB 2.5-inch SATA SSD, and it's worth being precise about what that does and doesn't buy, because it's an easy thing to oversell.
An SSD will not make the Core 2 Duo faster. It will not turn the old NVIDIA hardware into a modern video decoder, so streaming sites that lean on newer codecs will still struggle. It will not add memory. Anyone promising that an SSD makes an old laptop "like new" is selling something.
What it changes is the part of everyday use that a mechanical drive dominates, and on a machine of this age that turns out to be most of the waiting:
- Booting the operating system
- Launching a browser and opening large PDFs and service manuals
- Loading applications and switching between them
- Swapping to disk, which a 4 GB machine will do regularly
- General desktop responsiveness — the small stalls that make a computer feel old
The mechanism is latency, not throughput. Every time a mechanical drive is asked for data in a new place, a physical arm has to move and a platter has to rotate underneath it — milliseconds, per request, and an operating system boot is tens of thousands of scattered requests. An SSD has nothing to move; the same request is answered in a fraction of a millisecond. That's a difference of roughly two orders of magnitude on exactly the access pattern that software actually generates.
There's a caveat that applies to any machine this old, and this build is a clean illustration of it. The Burst Elite is a SATA III drive, rated for 6 Gb/s. The controller in this laptop runs at 3 Gb/s, which works out to something like 270 MB/s of real throughput once encoding overhead is counted, so the drive spends its life capped at roughly half what it's rated for.
That was known going in and it didn't matter, which is the point. The cap applies to large continuous transfers, and large continuous transfers are not what makes a desktop feel slow. The random-access gain is a property of having no moving parts to wait for, and an older interface doesn't take it away. Buying a slower-rated drive to "match" the port would have saved nothing and gained nothing.
The capacity went down, from 320 GB to 120 GB, and that was deliberate rather than a compromise. Storage is the one spec worth sizing to the actual job instead of buying the biggest number available: this machine holds an operating system, a browser and a pile of PDFs, which is nowhere near 120 GB. Paying for 500 GB of SSD to leave 400 of it empty would have bought nothing that shows up in use.
One detail that catches people out when they go shopping. This laptop takes a 2.5-inch SATA drive, the same shape and connector as the mechanical disk already in it. That is not the same thing as the M.2 stick most current SSDs come as.
NVMe, M.2 and mSATA drives will not fit this machine and are not adapters away from working in it. If you're buying for a laptop of this era, the form factor is the first thing to confirm, and it's the most common reason a perfectly good SSD arrives and goes straight back.
Deciding Whether an Old Laptop Is Worth Keeping
This is the actual decision behind most of these conversations, so here's how we'd frame it rather than what we'd tell you to do.
The useful question isn't "is this laptop still good?" An eighteen-year-old computer is not going to be good in the abstract. The question is "is there a specific job this machine can still do well?" For this one there is, and it's a narrow one: display documents and web pages on a bench, where its age doesn't matter and its being independently replaceable is a feature. Against that job, it's genuinely capable. Against video editing, modern games, or a current version of Windows, it isn't close, and no amount of money spent on it would change that.
Three things push the answer toward keeping a machine:
- The expensive parts are healthy. Board, screen, and GPU are what make a repair uneconomic. A live USB session answers that for free, which is why it comes before any quote.
- The fix is a commodity part. A SATA SSD, a stick of RAM, a battery, a fan — standard components with real supply. A model-specific board or panel for a machine this old is a different proposition.
- The job is a fit. A defined, modest task the hardware can still do properly, rather than a hope that it'll keep up generally.
And the honest version of the other side: if the board is faulty, if the screen is damaged, or if the machine needs to run current Windows and do current work, the money is better spent elsewhere, and we'd say so. Fitting an SSD to a laptop with a failing GPU buys a faster machine that dies anyway.
There's also a security answer worth knowing about, because it's the reason a lot of perfectly good hardware gets thrown out. This machine won't run a supported version of Windows, and running an unsupported one online is a bad idea. A current Linux release solves that on hardware Windows abandoned — the Mint release used here is built on an Ubuntu 24.04 LTS base, with security updates running into 2029, on a laptop from 2007. That's a real option, though it's a change of operating system rather than a free upgrade, and whether it suits depends entirely on what you need the machine to run.
The Result
The mechanical drive came out and the Patriot Burst Elite SSD went in, and Linux Mint was installed onto it and brought up to date. The laptop is back in service, doing the job it was rebuilt for: sitting on the bench and pulling up specifications, manuals and repair videos.
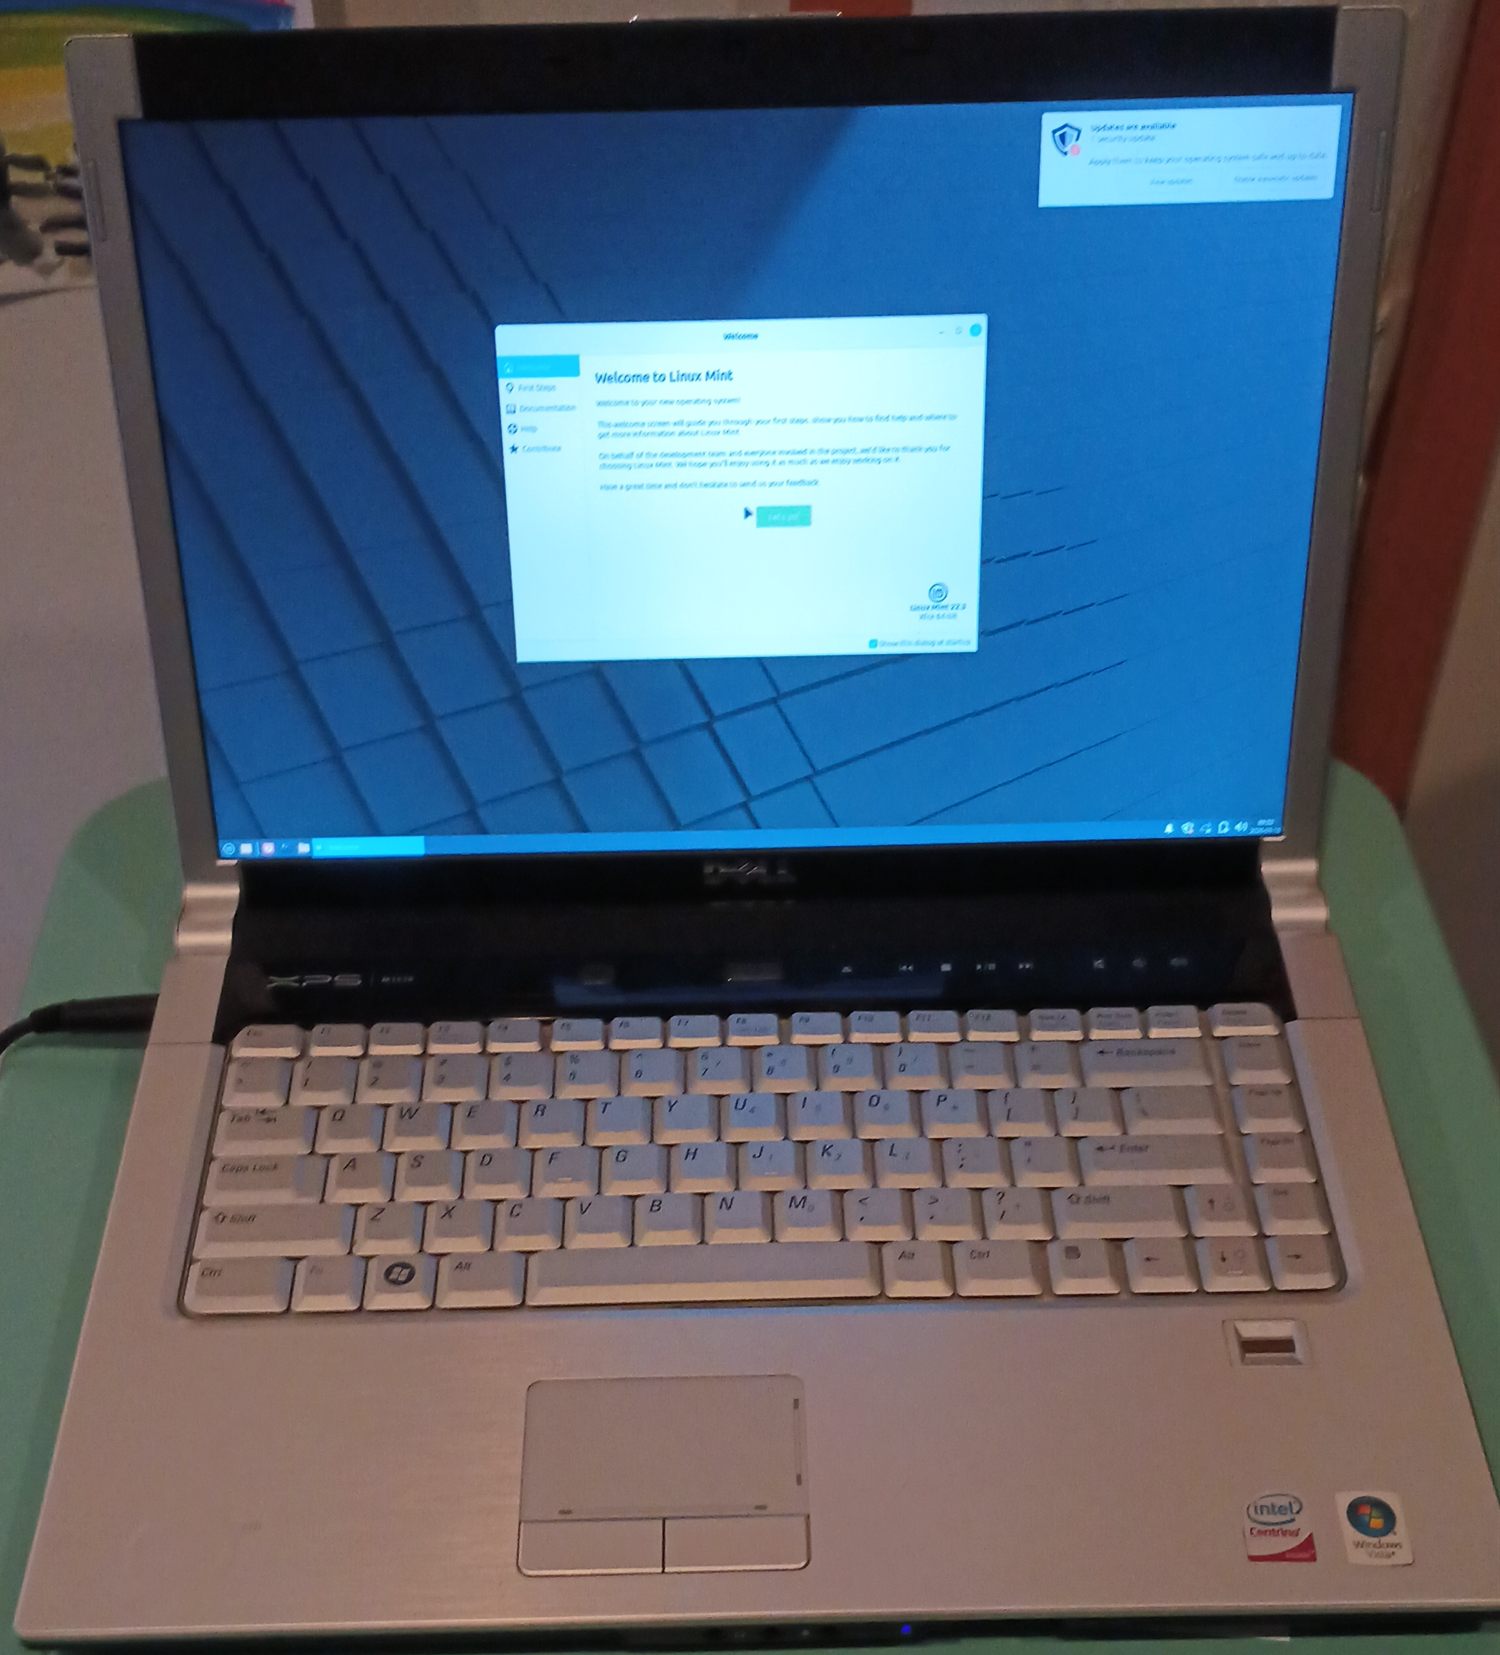
The honest verdict on how it runs: it's still a bit slow, and it does the job fine. Both halves of that matter. The SSD removed the waiting that came from a spinning disk; it did not and could not do anything about a Core 2 Duo and 4 GB of RAM. The machine feels its age the moment you ask it to do something a 2007 processor is bad at, and it doesn't feel its age at all when it's displaying a service manual, which is the entire reason it exists.
That's the outcome the earlier section predicted, and it's worth pointing at rather than glossing over. "An SSD will not make the Core 2 Duo faster" is a less appealing sentence than "an SSD makes an old laptop like new," and it's the one that turned out to be true. A realistic expectation set before the work is what makes a modest result feel like a success instead of a disappointment.
The old drive was not a dead drive, and that distinction is worth holding onto. Nothing on it had stopped working. It read, it wrote, it reported itself correctly. It had just slowed to the point where the machine couldn't do anything useful with it, including finish loading its own operating system. That's the ordinary end state of a mechanical drive that has been spinning since 2007, and it's a different situation from a disk that has failed. It was retired because it was the bottleneck, not because it was broken.
The part worth carrying to any other machine happened before a single part was bought. One USB stick and ten minutes converted "eighteen-year-old laptop that won't boot" into "one question about the cheapest component in it," and the answer to that question turned out to cost less than an hour of labor. That sequence is identical on a machine from last year, and it's what we do before quoting anything on a computer that won't start.
What This Job Shows About How We Work
"Won't boot" is a symptom, not a diagnosis.
It covers a failed drive, a corrupted install, bad memory, a dead GPU and a faulty board, and those range from free to not worth fixing. Any quote given before that list is narrowed is a guess with a number attached.
The best test is the one that rules the most out for nothing.
A live USB boot takes ten minutes, costs nothing, and clears the processor, memory, graphics, panel, input devices and networking in one pass. It goes early for the same reason the pump filter gets checked before the pump.
Know what a test can't see.
The live session cleared the hardware precisely because it never touched the internal drive — which means it says nothing about that drive. Being clear about a test's blind spot is what stops a good result from being over-read.
Ask the device what it knows about itself.
The BIOS reports what it can see on the SATA port. The drive keeps SMART data on its own condition. Reading what hardware reports about itself beats inferring it from the outside, and it's almost always faster.
Replace like with like.
Paste where the factory used paste, a pad where the factory used a pad. Substituting one for the other produces a repair that works on the bench and quietly runs hot for years.
Spend on the bottleneck, not on the spec sheet.
On this machine the storage is what made it feel old, so that's where the money went — 120 GB, not 500, because storage is worth sizing to the job rather than to the biggest number on the shelf.
"Worn out" and "broken" are different findings.
Nothing on this laptop had actually failed, including the drive that got replaced — it worked, it was just slow enough to make the machine useless. A part can be the right thing to replace without being a bad part, and saying which one you're looking at is the difference between a recommendation and a sales pitch.
Promise the result you can actually deliver.
This laptop is still slow, exactly as predicted before the part was bought, and it does its job well. Setting that expectation up front is the difference between a modest result landing as a success or as a disappointment. We'd rather undersell a repair and have it land well.
Sometimes the honest answer is don't.
This one is worth rebuilding because the expensive parts are healthy, the fix is a commodity part, and the job it has to do is realistic. Change any one of those and the advice changes with it. We'd rather tell you that before you spend money than after.
Technical Details
| Machine | Dell XPS M1530, regulatory model PP28L (model introduced 2007) |
| Symptoms | Cooling assembly due for replacement; installed OS would not boot |
| Cooling part fitted | Dell 0XR216 / XR216 heatsink-and-fan assembly (fan labeled FORCECON DFS531105MC0T, XR216 A00) |
| Thermal interfaces | CPU and GPU cleaned to bare metal with 99% IPA and given fresh compound; factory gap pad on the third contact left in place |
| Memory | 4 GB |
| BIOS report | Primary Hard Drive — 320 GB HDD |
| Diagnostic environment | Linux Mint 22.3 Xfce booted from USB, internal drive untouched |
| Confirmed working | Processor and memory, graphics and panel, keyboard, touchpad, Wi-Fi association, internet connectivity, rebuilt cooling under load |
| Storage identified | WDC WD3200BJKT-75F4T0, 320 GB 2.5-inch SATA mechanical, reported by lsblk as 298.1G |
| Storage fitted | Patriot Burst Elite 120 GB 2.5-inch SATA SSD, replacing the 320 GB mechanical drive |
| Interface limit | 3 Gb/s SATA on this chipset generation, so the SATA III SSD runs capped at roughly 270 MB/s |
| Operating system | Linux Mint 22.3 Xfce installed to the SSD and updated |
| Parts replaced | Cooling assembly, thermal compound, and the hard drive |
| Condition of the old drive | Working, not failed — it read, wrote and identified itself correctly, but had slowed to the point where the installed system never finished loading. Retired as the bottleneck rather than as a bad part; not tested with SMART, since it was being replaced either way |
| Status | Complete and in service as a workbench machine. Slow, as expected for the hardware, and capable of the job it was rebuilt for |
A Note on This Write-Up
This is one machine on our own bench, not a customer repair and not a universal procedure. Laptop disassembly varies enormously between models, and on many of them getting to the cooling assembly means most of a teardown. If you're working on your own machine: unplug it, remove the battery, and find the service manual for your exact model before opening anything — Dell publishes them, and this era of machine has more hidden screws and ribbon cables than you'd guess.
Everything described here was done. The one thing that wasn't is stated as such: the old drive was never put through a SMART check, because it was being retired for the SSD either way. Nothing on this page is offered as a measurement that wasn't taken.
Got a Laptop That Won't Start?
Before you decide it's finished, it's worth finding out which part actually failed — because on a lot of machines the answer is the cheapest component in them. We do the same triage on Windows and Mac laptops and desktops: work out what's genuinely broken, then tell you honestly what we find, including when the repair isn't worth doing. See what diagnosis and repair cost before you book.
Prefer to describe the problem first? Send us the details →
No transport charge if you drop it off in Leavenworth yourself, though the $50 diagnostic still applies. Pickup is $20/trip in the Wenatchee Valley corridor, $40 outlying areas.